实习第二周1
老大又出差了。我跟PM扯了半天,最后要用Java来开发这个网站,用SSH框架。于是就买了一本书,自己折腾。
Intellij IDEA 创建SSH项目
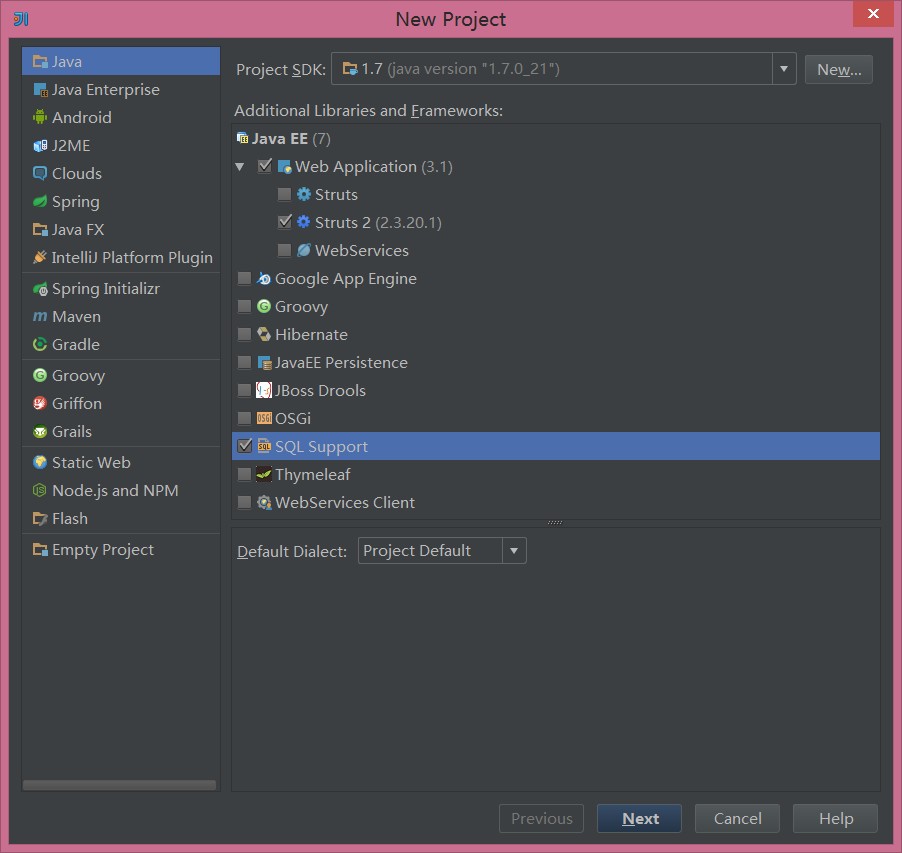
创建Java项目,选Web applicantion,勾上Struts2、Hibernate、SQL Support。

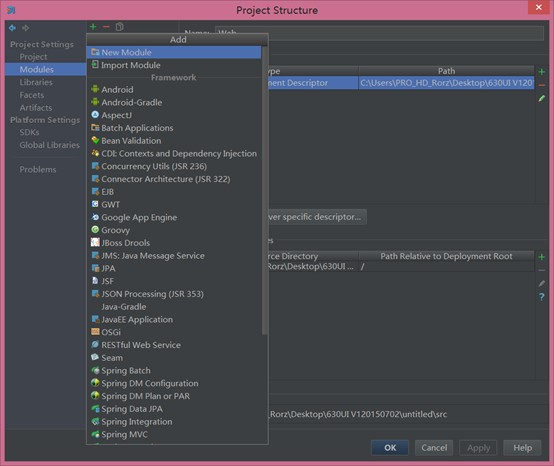
创建项目后在Project Structure里添加Spring

我感觉Spring主要是用来管理JavaBean,特别是JavaBean的自动注入。以下是一份SSH的Spring配置。
<?xml version="1.0" encoding="UTF-8"?>
<beans xmlns="http://www.springframework.org/schema/beans"
       xmlns:xsi="http://www.w3.org/2001/XMLSchema-instance"
       xsi:schemaLocation="http://www.springframework.org/schema/beans http://www.springframework.org/schema/beans/spring-beans.xsd">
    <bean id="sessionFactory" class="org.springframework.orm.hibernate4.LocalSessionFactoryBean">
        <property name="configLocation" value="hibernate.cfg.xml"></property>
    </bean>
    <bean id="hibernateTemplate" class="org.springframework.orm.hibernate4.HibernateTemplate">
        <property name="sessionFactory" ref="sessionFactory" />
    </bean>
    <bean id="transactionManager" class="org.springframework.orm.hibernate4.HibernateTransactionManager">
        <property name="sessionFactory" ref="sessionFactory"/>
    </bean>
    <bean class="org.springframework.aop.framework.autoproxy.BeanNameAutoProxyCreator">
        <property name="beanNames">
            <list>
                <value>userDAO</value>
            </list>
        </property>
        <property name="interceptorNames">
            <list>
                <value>transactionInterceptor</value>
            </list>
        </property>
    </bean>
    <bean id="userDAO" class="user.UserDAOImpl" abstract="true">
        <constructor-arg>
            <ref bean="hibernateTemplate" />
        </constructor-arg>
    </bean>
    <bean id="userService" class="user.UserServiceImpl">
        <constructor-arg>
            <ref bean="userDAO" />
        </constructor-arg>
    </bean>
    <bean id="serviceManager" class="support.ServiceManager">
        <property name="userService">
            <ref bean="userService" />
        </property>
    </bean>
</beans>
Struts2则是管理HttpRequest,配置拦截器处理分发不同的请求到具体的Controler,类似于urls.py。先要在web.xml里配置以下Struts2
<?xml version="1.0" encoding="UTF-8"?>
<web-app xmlns:xsi="http://www.w3.org/2001/XMLSchema-instance" xmlns="http://xmlns.jcp.org/xml/ns/javaee" xsi:schemaLocation="http://xmlns.jcp.org/xml/ns/javaee http://xmlns.jcp.org/xml/ns/javaee/web-app_3_1.xsd" id="WebApp_ID" version="3.1">
  <display-name> webpoj</display-name>
    <context-param>
        <param-name>contextConfigLocation</param-name>
        <param-value>/WEB-INF/applicationContext.xml</param-value>
    </context-param>
  <listener>
    <listener-class>org.springframework.web.context.ContextLoaderListener</listener-class>
  </listener>
  <filter>
    <filter-name>struts2</filter-name>
    <filter-class>org.apache.struts2.dispatcher.ng.filter.StrutsPrepareAndExecuteFilter</filter-class>
  </filter>
  <filter-mapping>
    <filter-name>struts2</filter-name>
    <url-pattern>/*</url-pattern>
  </filter-mapping>
  <welcome-file-list>
    <welcome-file>index.html</welcome-file>
    <welcome-file>index.htm</welcome-file>
    <welcome-file>index.jsp</welcome-file>
    <welcome-file>default.html</welcome-file>
    <welcome-file>default.htm</welcome-file>
    <welcome-file>default.jsp</welcome-file>
  </welcome-file-list>
</web-app>
然后在Struts.xml处理登录的Action。
<?xml version="1.0" encoding="UTF-8"?>

<!DOCTYPE struts PUBLIC
        "-//Apache Software Foundation//DTD Struts Configuration 2.3//EN"
        "http://struts.apache.org/dtds/struts-2.3.dtd">

<struts>
        <package name="untitle" extends="struts-default">
                <!-- 定义处理请求URL为login.action的Action -->
                <action name="login" class="action.LoginAction">
                        <!-- 定义处理结果字符串和资源之间的映射关系 -->
                        <result name="success">/index.jsp</result>
                        <result name="error">/login.jsp</result>
                </action>
        </package>
</struts>
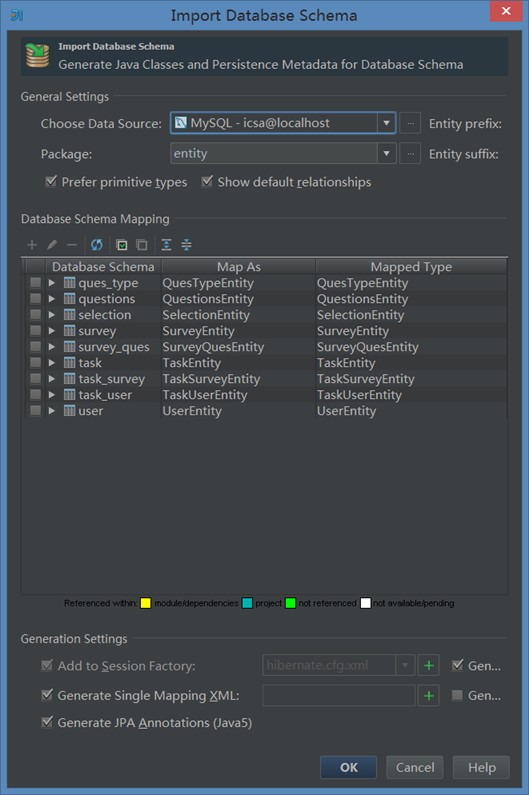
Hibernate则是数据库的持久化组件。可以用工具自动生成对应数据库的配置文件以及Entity类,还有主外键关系和其他详细约束
<?xml version='1.0' encoding='utf-8'?>
<!DOCTYPE hibernate-configuration PUBLIC
    "-//Hibernate/Hibernate Configuration DTD//EN"
    "http://www.hibernate.org/dtd/hibernate-configuration-3.0.dtd">
<hibernate-configuration>
  <session-factory>
    <property name="connection.url">jdbc:mysql://localhost:3306/icsa</property>
    <property name="connection.driver_class">com.mysql.jdbc.Driver</property>
    <property name="hibernate.dialect">org.hibernate.dialect.MySQLDialect</property>
  </session-factory>
</hibernate-configuration>


其他代码主要抄书,不贴了。
还写了几行安卓。
package com.net30wish.survey;

import android.app.Activity;
import android.os.Bundle;
import android.view.Window;
import android.view.WindowManager;

public class Index extends Activity {
    /**
     * Called when the activity is first created.
     */
    @Override
    public void onCreate(Bundle savedInstanceState) {
        super.onCreate(savedInstanceState);
        //去除标题栏
        requestWindowFeature(Window.FEATURE_NO_TITLE);
        //实现全屏(去除任务栏
        getWindow().setFlags(WindowManager.LayoutParams.FLAG_FULLSCREEN,
                WindowManager.LayoutParams.FLAG_FULLSCREEN);
        setContentView(R.layout.main);
    }
}
<?xml version="1.0" encoding="utf-8"?>
<manifest xmlns:android="http://schemas.android.com/apk/res/android"
          package="com.net30wish.survey"
          android:versionCode="1"
          android:versionName="1.0">
    <uses-sdk android:minSdkVersion="16"/>
    <application android:label="@string/app_name" android:icon="@drawable/ic_launcher">
        <activity android:name="Index"
                  android:label="@string/app_name"
                  android:screenOrientation="landscape"><!--横屏-->
            <intent-filter>
                <action android:name="android.intent.action.MAIN"/>
                <category android:name="android.intent.category.LAUNCHER"/>
            </intent-filter>
        </activity>
    </application>
</manifest>